
How to Write a Roofing Estimate: Line Items, Waste Factor and a Sample
A roofing estimate is more than a price per square. It is the document a homeowner uses to compare you with two or three other roofers, and the one your crew uses to know what to load on the truck. If it says "replace roof, $X," you will lose to the roofer whose estimate explains what is included. If it misses the drip edge or the decking allowance, you will eat the difference.
This guide explains every line that belongs in a residential roofing estimate, the math behind squares, pitch and waste, and how to turn the estimate into a signed contract. It ends with a full sample estimate for an 18-square asphalt shingle replacement. If you just need a blank form, grab our free roofing estimate template or the printable roofing estimate forms, then come back here for how to fill them in.
Key takeaways
- Measure in squares. One roofing square is 100 sq ft of roof surface, not floor area. Convert plan area to roof area with a pitch factor.
- Add waste after the pitch adjustment. RoofSnap's rule of thumb is 10 to 15% for waste, and up to 20% for highly complicated roofs.
- Itemize the "hidden" lines. Tear-off, decking allowance, underlayment, ice and water shield, drip edge, starter, ridge, vents, flashing, disposal and permit should each be visible.
- Know the contract rules. In California, a written contract is required for home improvement projects over $500, and the down payment is capped at $1,000 or 10% of the price, whichever is less.
What a roofing estimate must include (vs. a quote vs. a contract)
People use these words loosely, but they do different jobs:
At minimum, a roofing estimate should show:
- Customer name, property address and date
- Roof measurements: total squares, pitch, number of layers to remove, and the waste factor you applied
- Line items for tear-off, decking, underlayment, ice and water shield, drip edge, starter, shingles, ridge and hip, ventilation, flashing, labor, disposal and permit
- The shingle product line and color (or options), and the manufacturer warranty that applies
- Exclusions: for example, rotted rafters, gutters, skylights or chimney rebuilds unless listed
- How decking replacement and other unknowns will be priced if found
- Your license number, insurance, and how long the price is valid
For a broader checklist that applies to every trade, see what every contractor should include in an estimate.
Measuring: squares, pitch factor and waste
Most estimating mistakes start with the measurement. RoofSnap's Roof Estimating 101 sums up the basic unit: "1 square = 100 square feet of roofing surface." The key word is surface. A roof is sloped, so its surface is larger than the footprint it covers.
Step 1: Plan area
Measure the footprint of the roof including overhangs, from a site measurement, a plan or an aerial measurement report. For a simple 40 ft × 40 ft gable roof with overhangs, the plan area is 1,600 sq ft.
Step 2: Pitch factor
Multiply the plan area by a pitch factor to get the true roof surface. The factor equals √(1 + (rise ÷ 12)²). For a 6/12 pitch, that is √(1 + 0.25) = 1.118. So 1,600 sq ft × 1.118 = 1,789 sq ft, or about 18 squares. RoofSnap recommends taking pitch measurements in person, and our free roof pitch calculator does the conversion for you.
Step 3: Waste
Shingles get cut at rakes, hips, valleys and around penetrations. RoofSnap's example of an 18-square roof says you'll need "18 squares worth of shingles to cover the entire roof (plus 10-to-15% extra to factor in wasted material)," and suggests 20% for highly complicated roofs. A plain gable sits at the low end. Hips, valleys, dormers and multiple planes push you toward the high end.
Step 4: Bundles
RoofSnap's ordering rule is "3 bundles per 1 roofing square" for standard shingles. Check the wrapper, because some products differ. For our example: 18 squares × 1.10 waste = 19.8, round up to 20 squares, × 3 = 60 bundles.
Pitch also changes labor and safety. Steeper roofs need more staging and go slower, so many roofers carry a steep-pitch labor adder. For background on slope and drainage you can share with homeowners, see our roof construction guide.
The line items, one by one
Here is each line, the unit it is usually priced in, how to calculate the quantity, and what to watch for.
Labor, disposal, permits, and overhead and profit
Material lines are easy to check. Labor and overhead are where roofers lose money without noticing. A few rules of thumb that keep margin intact:
- Price labor per square with adders, not as one flat number. Steep pitch, two-story access, extra layers and cut-up roofs all take longer.
- Put disposal on its own line. Tear-off weight depends on layers. A second layer can mean a second dumpster.
- Include the permit and inspection time. Even when the fee is small, a failed inspection costs a crew day.
- Add overhead and profit as a margin, not a guess. Price = cost ÷ (1 − target margin). A 25% markup only gives a 20% margin. Use our profit margin calculator to check.
Sample roofing estimate: 18-square asphalt replacement
This sample is for a simple 40 ft × 40 ft gable roof, 6/12 pitch, one layer of existing asphalt shingles, replaced with architectural shingles. Measurements: 1,600 sq ft plan area × 1.118 = about 18 squares; eaves 80 LF; rakes 4 × 22.4 = 89.4 LF; ridge 40 LF; 10% waste. All prices are illustrative placeholders to show the math, not market prices or a quote. Replace them with your supplier and labor costs.
The direct cost comes to $9,856. Applying a 25% gross margin (price = cost ÷ 0.75) adds $3,285 for overhead and profit, for a total of $13,141. Notice that the shingles themselves are only about a quarter of the direct cost in this example. Labor, tear-off, disposal, permit and the "small" lines make up the rest, which is exactly why a single price-per-square bid is risky.
Insurance and storm estimates: working from an adjuster's scope
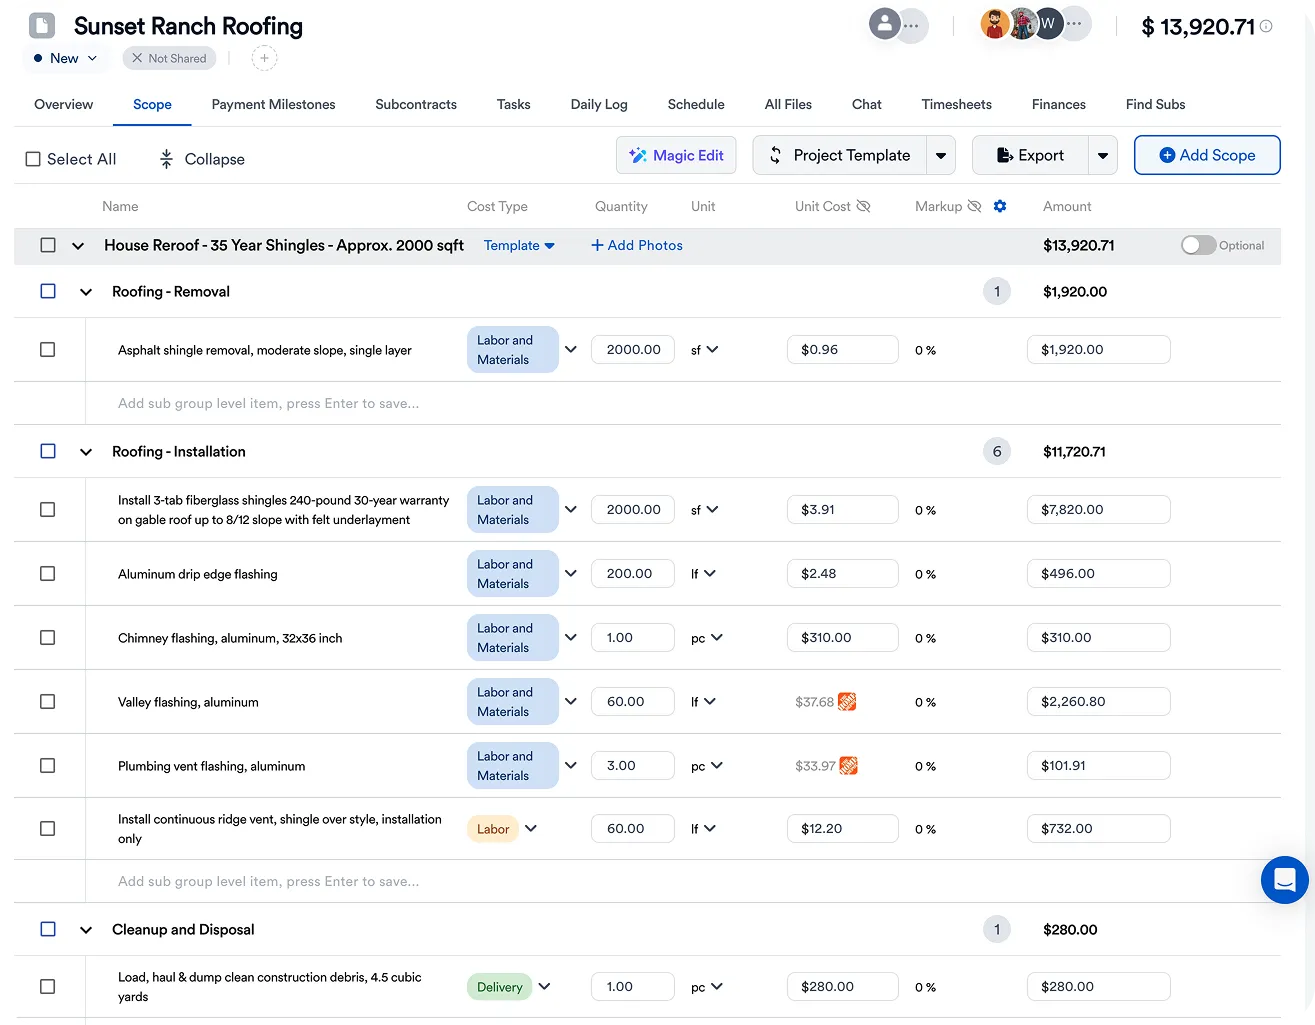
Storm and insurance roofing is a different workflow. The carrier's adjuster usually writes a scope of loss in an estimating platform, and your job is to compare it with what the roof actually needs, document any missing items (drip edge, starter, code upgrades, flashing), and present the homeowner with a clear estimate that ties back to the claim.
Retyping an adjuster's scope line by line is where hours go. Dilosa Home Services, a Dallas-Fort Worth contractor that does insurance work, used to rely on Xactimate plus manual re-entry. Now:
"Now, I don't have to type everything from scratch. I just drop the PDF into Eano Pro, and it generates the scope for me." — Gerardo Alas, Dilosa Home Services
Eano Pro's AI estimate builds a draft scope from a PDF or measurement report that you then review and price. A California general contractor we work with recommends it for exactly this kind of work:
"I would recommend the program to every contractor that is doing large projects—especially that has to do with insurance [or] government." — California Pro General Building
Whatever tool you use, keep three habits on insurance jobs: list supplements as separate lines with photos, keep the homeowner's deductible and any upgrades they pay for out of pocket clearly separated, and never sign a contract that conflicts with the claim.
Presenting options and getting it signed
Homeowners comparing roofers want a choice, not just a price. A good / better / best structure lets them pick without you rewriting the estimate:
Build all three from the same takeoff so the only difference is the lines that change. Then send it as a proposal the client can e-sign. Dilosa found that speed at the kitchen table matters:
"The ability to generate estimates on-site and get them signed right away is a game-changer." — Gerardo Alas, Dilosa Home Services
From estimate to signed contract
Once the homeowner says yes, the estimate becomes a contract. Rules vary by state. In California, the Contractors State License Board (CSLB) says "a written contract is required for all home improvement projects over $500" and that "the down payment cannot be more than $1,000 or 10 percent of the contract price, whichever is less." On the sample job above, that means the down payment is capped at $1,000. Check your own state's rules before you set your payment schedule.
Repair estimates vs. replacement estimates
Not every call is a full tear-off. Repair estimates use the same discipline at a smaller scale, but the risks are different. On a replacement, the unknowns are mostly under the shingles. On a repair, the unknown is often the cause: a leak at a wall may be a flashing problem, a cracked boot, or water coming in somewhere else and running along the deck.
- Price the diagnosis. Many roofers charge a trip or inspection fee that is credited if the repair is booked. Say so on the estimate.
- Use a minimum charge. Small repairs still need a crew, a truck, ladders and safety setup. A minimum protects you on half-hour jobs.
- Describe the fix, not just the price. "Replace 3 pipe boots and reseal step flashing at the left wall" is easier to approve than "roof repair."
- State what is not guaranteed. A repair on an aging roof does not make the rest of the roof new. Put that in writing.
- Photograph before and after. Photos attached to the estimate and the invoice reduce callbacks and disputes.
If a repair estimate starts to approach a meaningful share of a full replacement, show both. Homeowners appreciate seeing the trade-off, and it positions you for the replacement when the time comes.
Reading a measurement report before you price
Aerial measurement reports save a roof climb on the first visit, but they are only as good as how you read them. Before you price from one, check:
- Total area and predominant pitch match what you saw from the ground. Mixed-pitch roofs should list area by pitch.
- Eaves, rakes, ridges, hips and valleys are listed in linear feet. These drive drip edge, starter, cap and ice and water quantities.
- Penetrations (pipes, vents, skylights, chimneys) are counted. Reports often miss small pipes, so confirm on site.
- The suggested waste factor fits the roof complexity. Don't accept a default without looking at the cut-up.
- Layers and decking can't be seen from the air. Confirm the layer count at a rake edge or in the attic.
Roofing estimate mistakes that cost margin
- Using plan area instead of roof area. Skipping the pitch factor on a 6/12 roof understates materials by about 11% (1,600 vs. about 1,789 sq ft).
- Applying waste before pitch. Always calculate roof area first, then add waste.
- No decking allowance. Without a stated allowance and per-sheet price, rotten decking becomes an argument instead of a change order.
- Forgetting the small lines. Drip edge, starter, pipe boots and step flashing add up.
- One flat labor rate. Steep, tall or cut-up roofs need labor adders.
- Leaving out disposal and permit. These are real costs on every tear-off.
- Confusing markup and margin. A 25% markup is a 20% margin. Price from the margin you need.
- No exclusions. Spell out what is not included: gutters, skylights, chimney work, structural repairs.
Bottom line
A strong roofing estimate starts with the right measurement (squares, pitch factor, then waste), breaks out every line a homeowner might otherwise question, prices labor and overhead realistically, and moves cleanly into a signed contract. Use the sample above as a checklist, plug in your own costs, and see how Eano Pro handles roofing contractor estimating from measurement to signature.
Send your next roofing estimate from Eano Pro. Start a free trial!